Instructions & Guidelines
Create add-on
How to create add-on?
You’ll have complete independence and autonomy over building your add-on. This means that you’ll build it locally, but before submitting your code for a review, you should test it in the testing environment provided to you. Also, check out our REST API documentation and Development Toolkit section to get a better insight on how to build and maintain add-ons. Add-on then needs to be approved by our developers in the reviewing process and then it can be published.
To make sure the whole process goes smoothly and your request is approved shortly, we will provide you with the necessary requirements and standards all CAKE.com add-ons should meet in order to be published.
To create add-on:
- Go to app.clockify-marketplace/developer
- Create your developer account
- Go to Add-ons page
- Click CREATE ADD-ON
Now, complete a two-step process and enter the required data.
1. Basic information
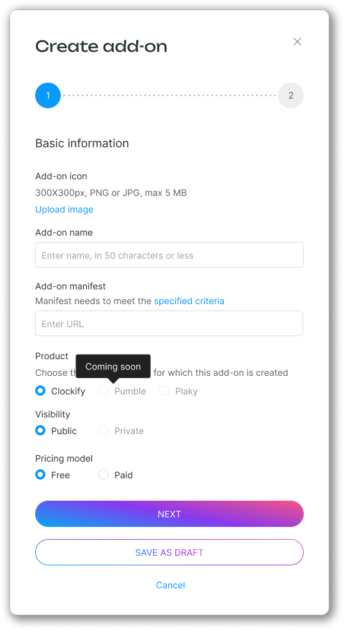
- Add-on icon: Upload image
- Add-on name: Choose a descriptive name that users can easily understand
- Add-on manifest: Enter URL
- Product: Refers to the application for which you are creating add-on
At the moment, you can only choose Clockify. You’ll be able to create add-ons for Pumble and Plaky soon.
- Visibility: Public – Add-on is visible to everyone and allows users within the CAKE.com community to share it.
At the moment, add-ons can only be public. Private add-ons are coming soon.
- Pricing model: Define pricing model for your add-on.
- Free
- Paid
- Next: Save all information and proceed with the step 2.
2. Listing
Information you add in the listing will be available in the Marketplace. Use it to help drive users to your add-on.
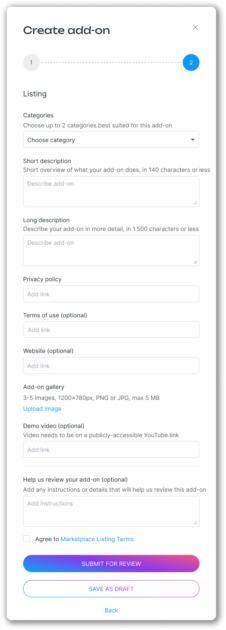
- Choose category: Define a niche or business sector you’d like to improve by building this add-on. In the Marketplace, published add-on will be placed in the category you selected here.
- Short description: Give a short overview of the purpose of your add-on and solution it provides
- Long description: Explain what your add-on is providing in greater detail and the value it brings to users
- Privacy policy: Define privacy policy and clearly disclose which information you’re collecting in this manner
- Terms of use (optional): Along with privacy policy, you can also add terms of use users need to agree to, in order to proceed with installation
- Website (optional): Add a link to the website that contains more information about add-on. Creating a website that promotes your add-on can help you attract more users.
- Add-on gallery (optional): Upload a set of images, or screenshots that reflect the purpose and promote your add-on in the best way. You can upload up to 5 images.
- Demo video (optional): Add demo to spread the word, boost traffic, or use it as an instructional video. Video needs to be publicly accessible on YouTube.
We encourage you to provide some additional instructions, including information that would be relevant to the person doing an add-on review like some additional notes or any other kind of specific guidelines.
Finally, by checking the Marketplace Listing Terms box you agree that you’ll meet and oblige the listing terms stated there as long as your add-on is part of the CAKE.com Marketplace.
Information provided in this step will be published and available along with the add-on on the Marketplace website.
After you’ve completed the two steps, click the SUBMIT FOR REVIEW button and your add-on will be submitted to the CAKE.com Marketplace team for a review.
How does reviewing work?
Once you click the SUBMIT FOR REVIEW button, a new add-on version request will be created. Request will get a pending status and will be sent to our team for a review. You will get an email that confirms you have successfully submitted a request for new version.
When it’s done, you will receive an email informing you that your request is approved, or denied. The request will also be appropriately marked as approved or denied in your profile.
If denied, we’ll send you the feedback notes from our team that could help you understand why the request was denied. You’ll also be able to see the request, edit it based on the feedback you received and submit it for a review again.
If approved, you can continue and publish the version directly from the email you received, by clicking PUBLISH. You’ll receive another confirmation email that will inform you that your add-on is published and available in the marketplace. Click View [addonname] to see it in the marketplace.